
Once you start using histograms it will not be long before you discover just how much of an indispensable tool they are particularly in the post-processing stage of photography. I recently began to investigate grey and color histograms while using Adobe’s Lightroom but histogram have been more or less omnipresent and my Nikon DSLR has one though I have never bothered with it.
Luminosity Histograms
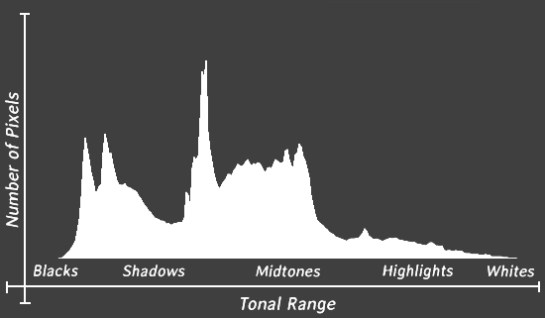
A simple definition of a histogram suggests that it is a graphical representation of all the pixels captured during an exposure. The grey histograms are also known as luminosity histograms for this very reason as they represent the relative darkness or brightness of all the pixels in an exposure.
It is important to understand that luminosity histograms do not refer to any pixels with a grey color. Rather the explication is that a single pixel is constituted of a mix of red, green and blue which as inputs to a formula will give result to the final place of the pixel in a histogram.
It takes into account that the human eye is more sensitive to green, followed by sensitivity to red; and least sensitive to blue.
This representation is made on the basis of a scale starting from the left side of the histogram with blacks, shadows, midtones, highlights and finally whites on the far right. In all, 255 tones can be represented from 0 on the left to 255 on the right.
What can be accomplished with histograms?
Ideally we evaluate the quality of a photo by looking at three aspects that are visible from a histogram, these are:
- Exposure: a measure of how much light is captured by film or a digital camera’s sensor through adjustment of the shutter speed, aperture and/or sensor’s ISO settings
- Clipping: a measure of parts of the image which are too dark or too bright to provide any useful details
- Contrast: the difference between darkest parts of the image and the brightest parts of the image
Evaluate the Exposure Quality
- You can evaluate the exposure of the image by looking at how tones are distributed across the histogram. Sudden cutoffs in the blacks (left side histogram); low shadows and midtones relative to high peaks in the whites indicate an underexposed image (below)
- If the highlights are not clipping and there is a gap on the right, this is suggestive of a situation in which exposure could be safely increased
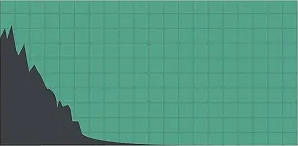
An underexposed image
- You can determine how well the image is exposed. A properly exposed image will be demonstrated as a bell curve on a histogram. Most of the tones will be in the midtones and gradually taper off at either extremities but it is not a hard and fast rule (below)
A normally exposed image
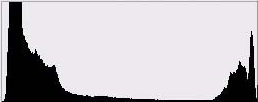
- You can make out if the image is darker or lighter as the tones will be further pushed to either the left or right but it does not necessarily suggest that the photo is too dark or bright rather it indicates a composition that is atypical of what we usually see

An image scanned from a color negative
A histogram depicting the above color negative shows good exposure
Check for Clipping
- When reading a histogram ensure that none of the tones are reaching the edge of the histogram at either extremities – left nor right
- Leaning against the right wall of the histogram indicates overexposure that is clipping highlights. Clipped highlights are evidence of clusters of pixels so bright that details are being lost (below)
Clipping of highlights
- Similarly, leaning against the left wall of the histogram indicates clusters of pixels so dark that details are being crushed (below)

Clipping of shadows
Q: Can overexposure or underexposure causing clipping?
A: Yes, overexposure or underexposure can cause clipping. Clipping often affects the highlights or the shadows
Optimizing Contrast
- Contrast is the difference between light and dark tones and as a basic rule should be set such that lighter parts of the image do not overwhelm the darker parts
- A histogram may have shifted to the right where the majority of pixels represent brightness and in such cases it is indication that not enough contrast is present in the photo
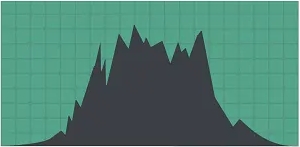
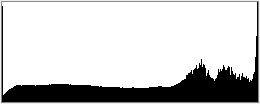
- Peak in the blacks and the whites represented as a “U” shape may also indicate a high contrast image from which it will be difficult to recover details so care must be taken in such situations (below) at the time of exposure
A high contrast image
Additional Notes:
- Depending on the photographer’s intended composition an image may be set in a dark room or adjusted to pick up only the midtones from the subject’s body. In these cases the histogram would be heavily shifted to the left and still be perfectly acceptable as a low key image
- The reverse situation of low key is high key image where most of the tones represented are brighter. Correspondingly the histogram will be shifted to the right and is acceptable if it was the photographer’s intention
- Hard and fast rules should not be applied when considering histograms, rather histograms should be considered in relative terms to the image taken and used as a guide for fine corrections
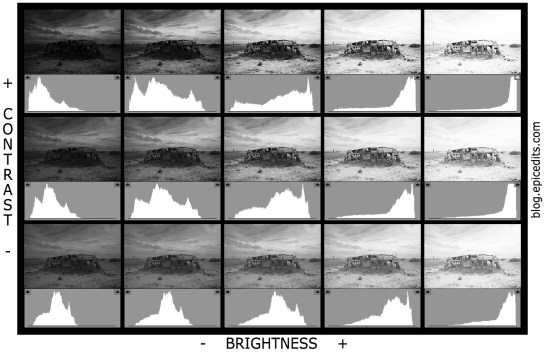
A variety of histograms reflecting changes in contrast and exposure
